
How Can We Help?
The 2GIG GC3 requires a special battery pack available for purchase from the manufacturer.
After connecting or wiring the DC power supply on the panel, use these steps to connect the backup battery.
To replace the battery in a 2GIG GC3:
If desired, put the system in test mode with the monitoring station before proceeding.
- Disarm the panel.
- Power off the panel.
- Remove AC power from the panel.
- Disconnect the panel from the mounting plate.
- Disconnect the old battery from the PCB battery connector.
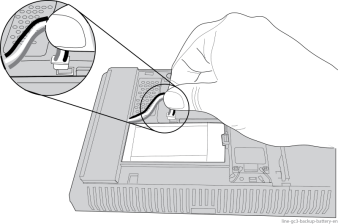
- Ensure the new battery is properly seated in the GC3 chassis. The battery’s label should be facing up and the battery’s connector wire should be on the left with the wire running in the empty space between the battery compartment and Cellular Radio Module’s compartment.
- Insert the wired battery pin into the PCB battery connector. The connector is located directly behind the DC power adapter barrel jack.
- Reconnect the panel to the mounting plate.
- Restore AC power.
Important: The GC3 panel does not recognize the backup battery connection until the AC power supply is plugged into the wall outlet.