How Can We Help?
Overview
Video Analytics continuously scans your property and notifies you when a person, vehicle, or animal is detected. Advanced detection rules enhance perimeter security by alerting you when someone’s coming or going, or even loitering on your property.
With Video Analytics, you’ll get enhanced notifications with thumbnail images showing people, vehicles, and animals. You can also use advanced detection rules to draw virtual tripwires across your driveway and virtual fenced-in zones on your property. Receive email and text notifications whenever:
- A vehicle pulls into the driveway or a person walks up the front steps
- Anyone loiters in a specific zone on your property
- A pet jumps up on the sofa or enters an off-limits flowerbed
- A child leaves the yard or someone drives off at night
Video Analytics can spot what’s important, even if there’s a lot going on.
Requirements
The following video devices are compatible with Video Analytics:
- 1080p Outdoor Wi-Fi Camera (ADC-V723)
- Indoor Fixed w/IR (ADC-V522IR)
- Outdoor Wireless (ADC-V722W)
- 180° HD Camera (ADC-V622)
- Indoor/Outdoor Mini Bullet (ADC-VC726)
- Indoor/Outdoor Dome (ADC-VC826)
- Indoor/Outdoor Turret Camera (ADC-VC836)
- Indoor/Outdoor Bullet Camera (ADC-VC736)
For information about these cameras and the requirements to use Video Analytics, contact your service provider.
Step 1: Camera Setup
Camera position
- Position the camera so that targets can be fully seen inside the camera’s field of view and not farther than 25 feet away (15 feet at night).
- The camera should be positioned 8-16 feet above the ground, angled downward between 30°-60°.
Note: This recommended angle should provide for an ideal field of view while avoiding clouds and trees. Video Analytics is designed to work with an angled-down perspective; not horizontal, and not top-down.
Important: The camera should be mounted in such a way that a vehicle’s headlights do not shine directly into the camera, affecting exposure and IR settings.
- Verify that the camera is clearly facing the ground or floor of the area being monitored.
Note: Video Analytics operates by tracking a target’s feet or a vehicle’s wheels.
- Be aware of any bright lights (i.e., motion-triggered flood lights) near the camera that may attract insects or affect exposure and IR settings.
- If the camera is repositioned, recreate all of the rules.
What to record
Video Analytics detects and classifies people, animals, and vehicles. Position the camera with a view that would be interesting to a home security customer.
Successful camera positions include:
- Overlooking a driveway
- Overlooking a front porch monitoring or wherever packages are dropped off
- An area of interest around a yard, where kids or animals are sometimes seen
- Indoor entryways, exit ways, or hallways of interest
Avoid:
- Areas with constant or uninteresting motion (e.g., roads with regular vehicle movement, trees constantly swaying in the wind, etc.)
- Pointing cameras out a window, as screen interference and reflections cause Video Analytics performance issues
Step 2: Create a Rule with Video Analytics
Video Analytics rules can be configured using the website or the app.
Note: It is possible to create up to three Video Analytics rules on the same camera. Additionally, ground zones and tripwires can overlap.
Add the rule
Using the website:
- Log into the website.
- Click Video.
- Click Recording Rules.
- Click Add Rule.
- In the New Video Recording Rule window, select Video Analytics.
Using the app:
- Log into the app.
- Tap
 .
. - Tap Video.
- Tap
 .
. - Tap Recording Rules.
- Tap Add New Rule.
Rule selection
- Click to select the desired camera.
- Click to select the rule type.
- Use a Tripwire rule when you expect a target to cross through the camera’s field of view or when objects enter or exit an area (e.g., a car pulling into or backing out of a driveway).
- Use a Ground Zone rule when you expect a target to loiter in the camera’s field of view (e.g., a person delivering a package on your front porch).
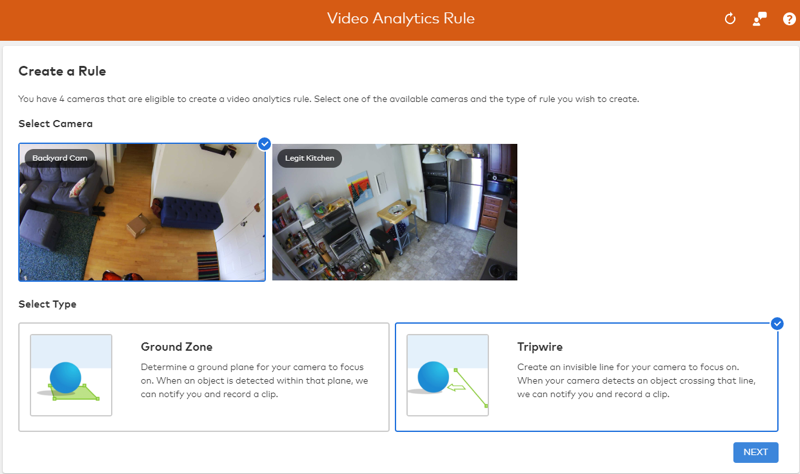
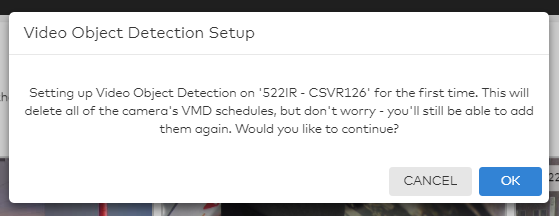
- All Video Motion Detection (VMD) schedules associated with a camera must be deleted before setting up a Video Analytics rule. When prompted with this warning, click OK to continue.
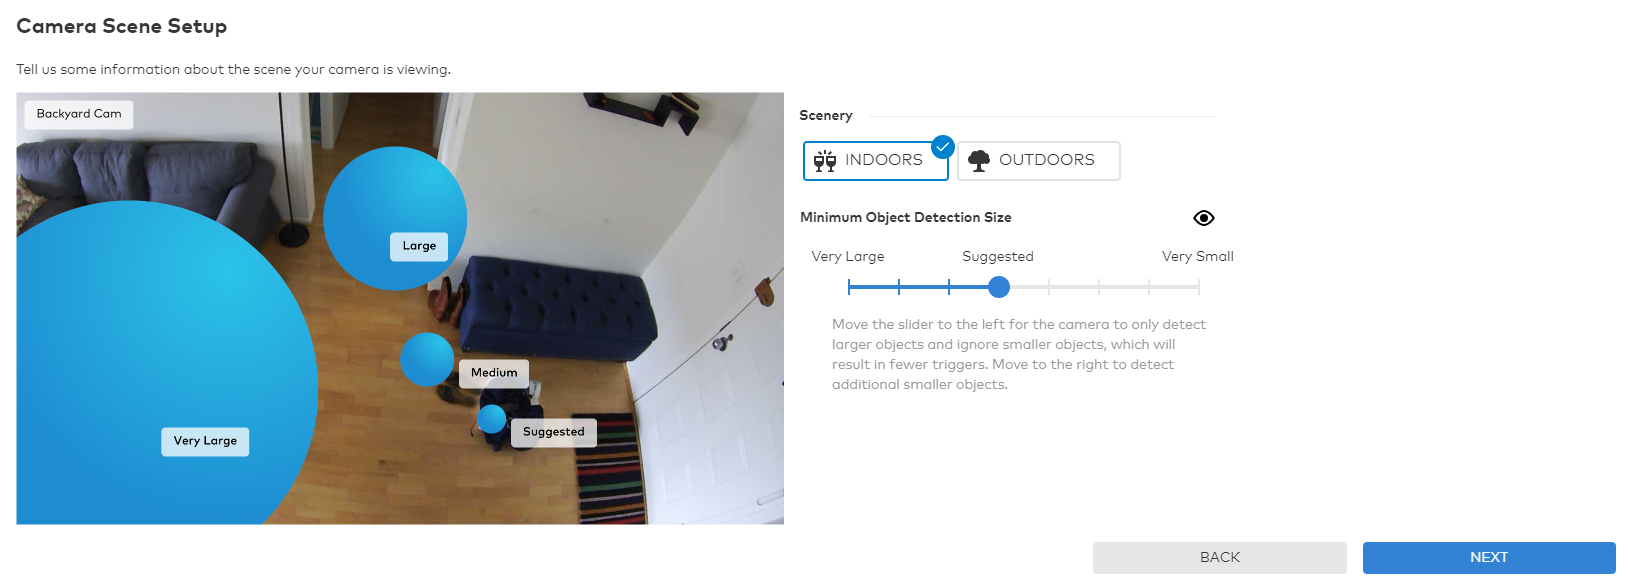
Camera scene setup
- Set the scene to indoors or outdoors based on what the camera is pointing at.
- The camera should be marked outdoors if it will be exposed to rain, snow, spider webs, or moving trees and set to indoors if in a controlled outdoor environment (e.g., a screened-in porch).
Note: This setting is specific to a camera, not a rule, and must be the same for all rules on a camera.
- The camera should be marked outdoors if it will be exposed to rain, snow, spider webs, or moving trees and set to indoors if in a controlled outdoor environment (e.g., a screened-in porch).
- The Minimum Object Detection Size slider determines the minimum size of objects detected by the rule.
- When set to Very Large, there will be fewer triggers, as it will only detect larger objects and ignore smaller ones. Very Small detects additional smaller objects.
Important: It is recommended to keep this at its suggested value upon initial rule creation.
- When set to Very Large, there will be fewer triggers, as it will only detect larger objects and ignore smaller ones. Very Small detects additional smaller objects.
Configure Rule – Ground Zone
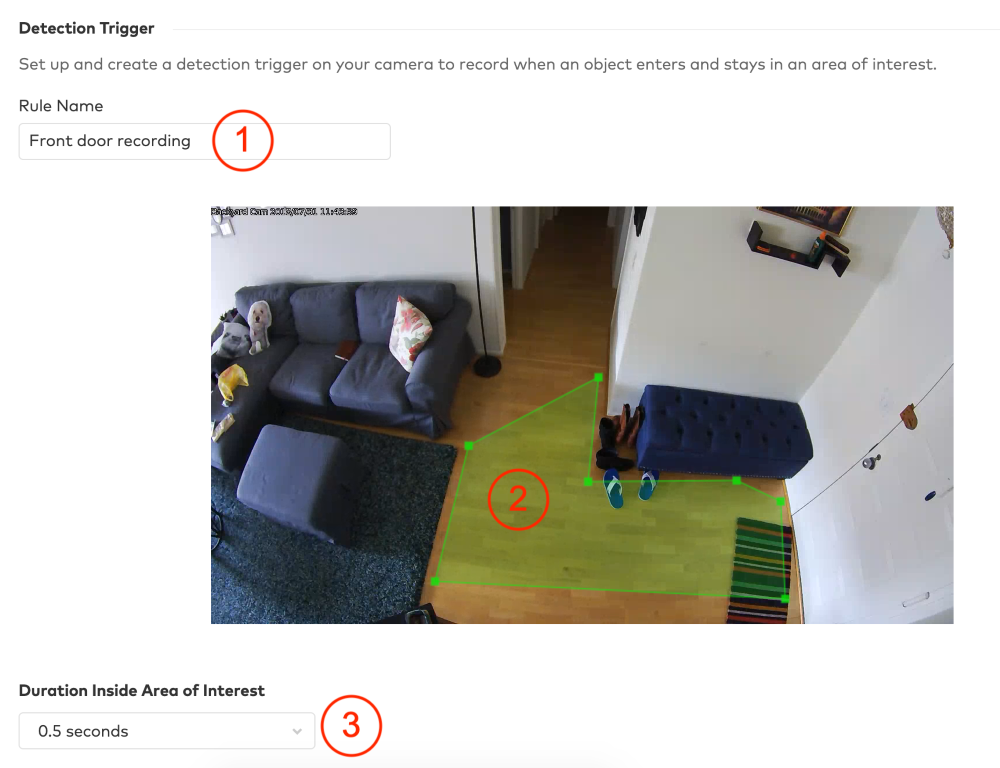
- Give the rule a name to help reference it later (e.g., Front door recording).
- Define the area of interest. Draw a shape covering only the ground where the target’s feet will loiter.
- Double-click inside the camera’s field of view to draw a new shape from scratch.
- Click and hold inside the shape to move it around.
- Hold right-click to rotate the shape.
- Set the duration inside the area of interest. Customize the time a target must remain inside the drawn shape before notifying you and recording a clip.
Configure Rule – Tripwire
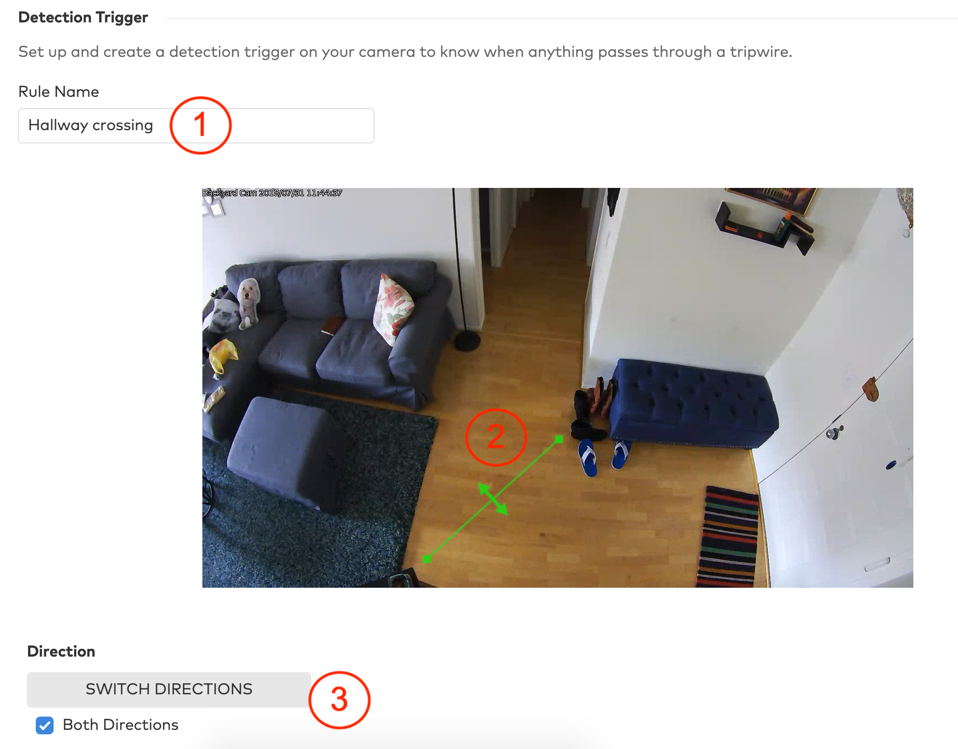
- Give the rule a name to help reference it later (e.g., Hallway crossing).
- Draw the tripwire covering only the ground where the target’s feet will cross.
- Select which direction to monitor the flow of traffic, or choose to monitor in both directions.
Note: Targets will be monitored when moving in the direction of the tripwire’s arrow.
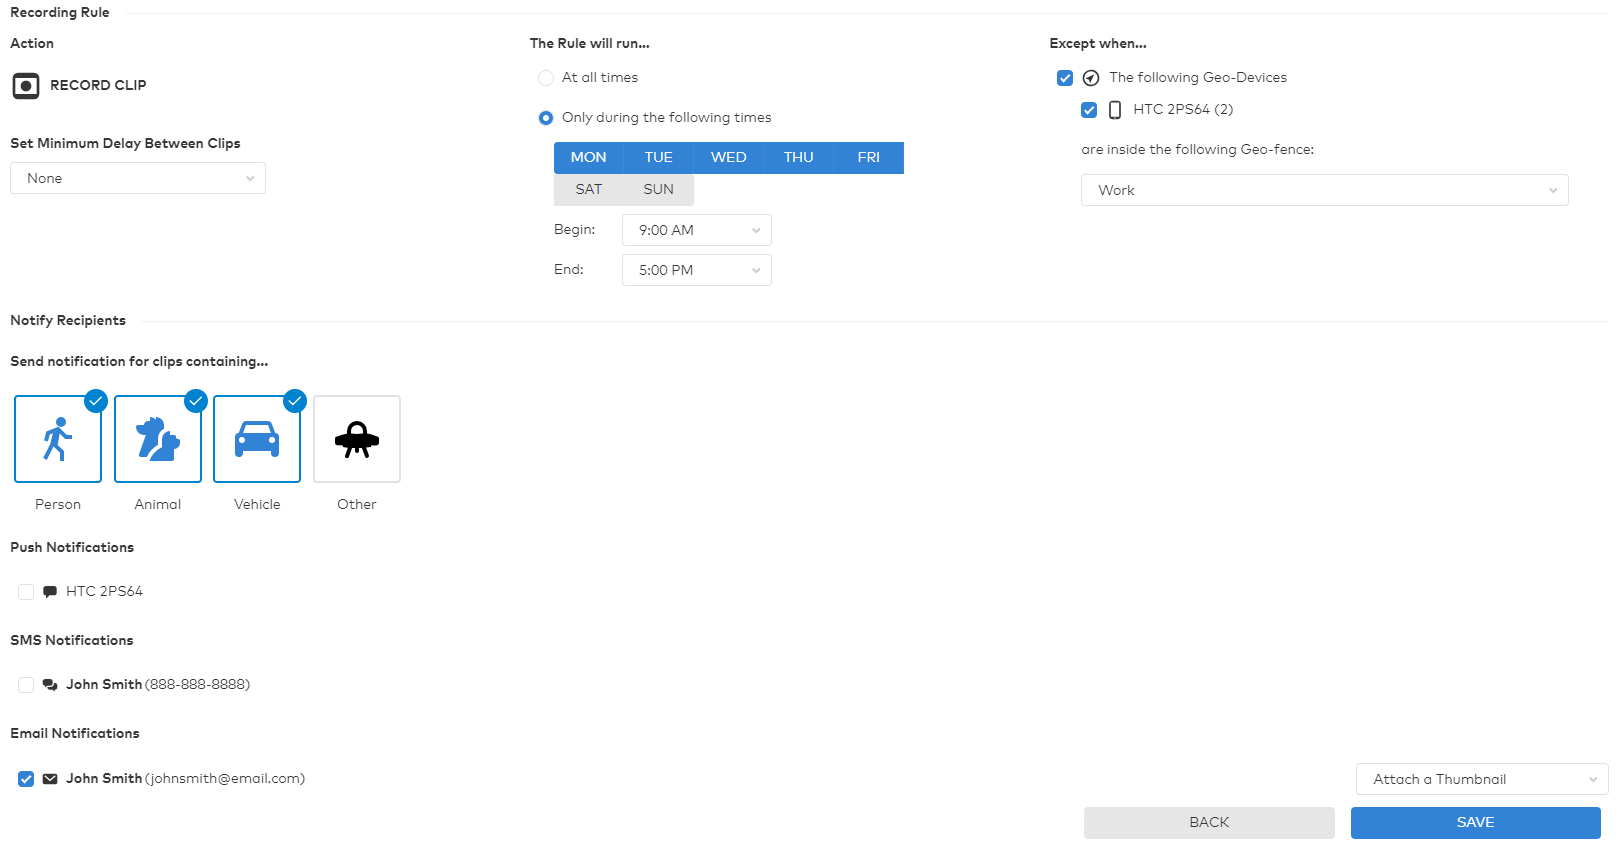
Rule scheduling and notifications
- Select whether the rule should be active at all times or only during specific days/times, along with any exceptions.
- Set the minimum time delay between clips. The shortest duration of time the rule will activate during times of constant movement.
- Select the types of objects that must appear in a clip to trigger a notification. A clip will still be recorded when any object type violates your rule.
Note: This option is solely used for sending notifications and will not alter which clips are recorded.
- Choose how to receive notifications. It is recommended to push notifications to your phone using the dropdown option to attach a thumbnail.
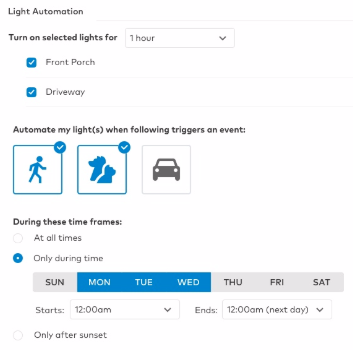
Add a light automation rule
Camera-driven light automation rules require at least one Z-Wave light device enrolled on the account.
Note: Lights cannot be enabled during a time when the Video Analytics rule is not set to record (e.g., if a tripwire rule is drawn on a driveway and set to record only at night, lights cannot be set to turn on during the daytime because no clip would have been recorded).
- Using the Turn on selected lights for dropdown menu, select how long the lights should turn on for.
- Select which lights to be automated by the rule.
- Select which events should turn on the lights when triggered.
- Select a time frame for the rule to occur.
Ensuring rule accuracy
- Avoid intersecting tripwires or overlapping ground zones with objects that are prone to movement, such as trees, bushes, or other objects that move in the wind.
- Only draw the rule where the feet or wheels of an object will cross.
- Do not increase the size of the loiter zone or tripwire to cover the whole of the target.
- Do not include furniture, walls, trees, or other structures in the rule.
- After observing what the rule detects over a few days, consider adjusting the Minimum Object Detection Size slider.
- Increasing the size will help to reduce false detection.
- Decreasing the size helps detect smaller targets.
Step 3: Viewing the video clips
To view video clips using the website:
- Log into the website.
- Click Video.
- Click Saved Video Clips.
- Any clips with a valid person, vehicle, or animal classification appear here by default. To see clips only with a specific classification, or clips without
a standard classification, change the selection in the Filters dropdown menu.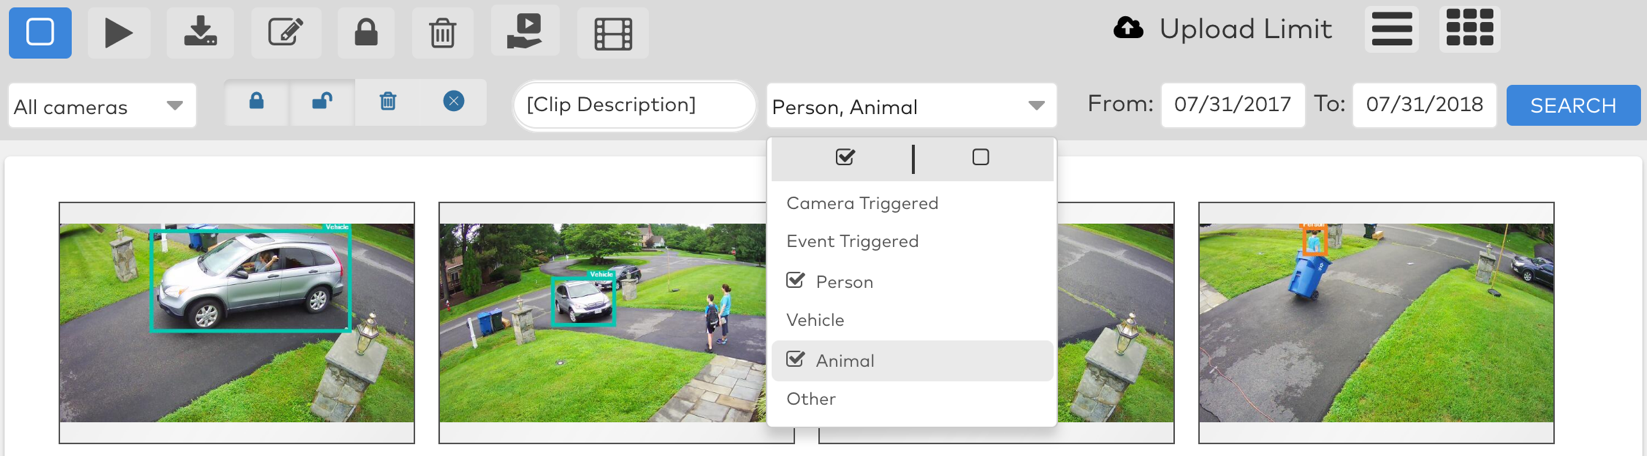
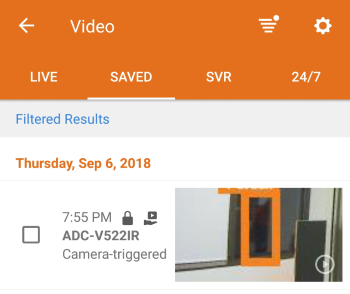
To view video clips using the app:
- Log into the app.
- Tap .
- Tap Video.
- Tap Saved.
- Any clips with a valid person, vehicle, or animal classification appear here by default. To see clips only with a specific classification, or clips without
a standard classification, change the selection in the Filtered Results dropdown menu.