How Can We Help?
Smart Humidity Control and Display brings exciting features to the Smart Thermostat. Users with an eligible Smart Thermostat (ADC-T3000 or ADC-T2000) can view and control the humidity level in their home or business using the website or app.
Humidity notifications provide an extra layer of protection against mold growth. The Smart Humidity function is beneficial in varying climates from very hot and humid areas in the summer to very cold or dry areas in the winter.
For information about installing or configuring Smart Humidity, contact your service provider.
View current humidity level
Users with a Smart Thermostat and compatible security panel or hub can now see their current humidity level by clicking on the thermostat card on the website or app.
Note: The ADC-T3000 locally displays the humidity percentage. No Smart Thermostat firmware version is required to display the humidity level on the website and app, but Smart Humidity Control requires ADC-T2000 version 1.50+. For information about how to find the thermostat firmware, contact your service provider.
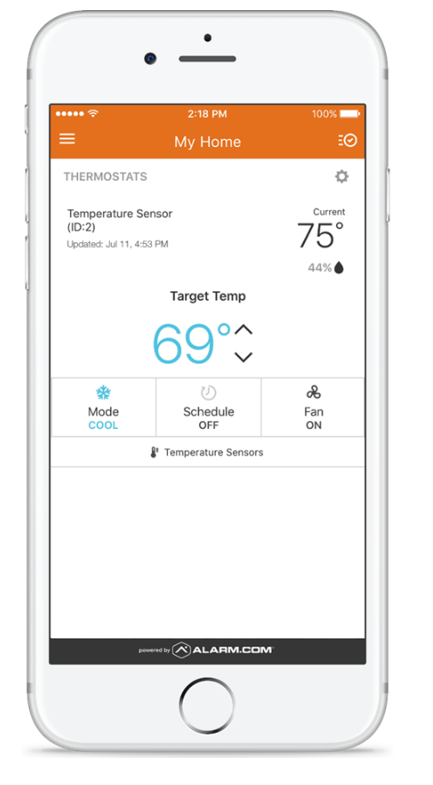
The following image displays a thermostat with a 44% humidity reading on the app.
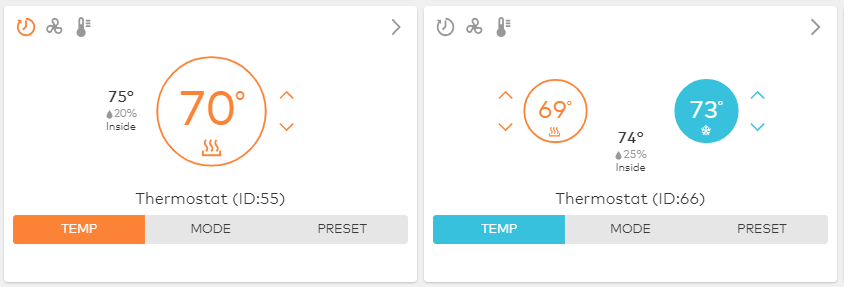
The following image displays two thermostats on the home page of the website. The first thermostat is in heat mode with a 20% humidity reading. The second thermostat is in auto mode with a 25% humidity reading.
Enable the Smart Humidity feature
Customers can enable Smart Humidity Control using the Customer Website or app.
Important: While the ADC-T3000 is natively compatible with humidity control, the ADC-T2000 must be on version 1.50+. For information about how to find the thermostat firmware, contact your service provider.
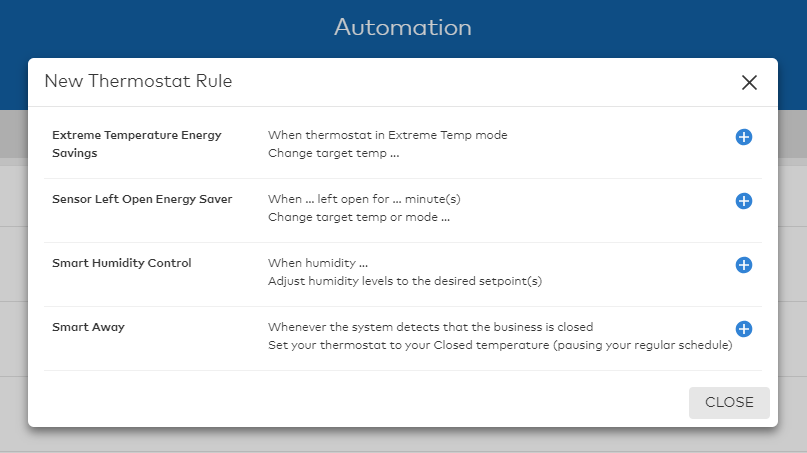
To enable Smart Humidity Control using the website:
- Log into the website.
- Click Automation.
- Click + Add New Rule.
- Click Thermostat Rule.
- Click Smart Humidity Control.
- Using the dropdown menus, select the desired humidity setpoints.
- Click Save.
To enable Smart Humidity Control using the app:
- Log into the app.
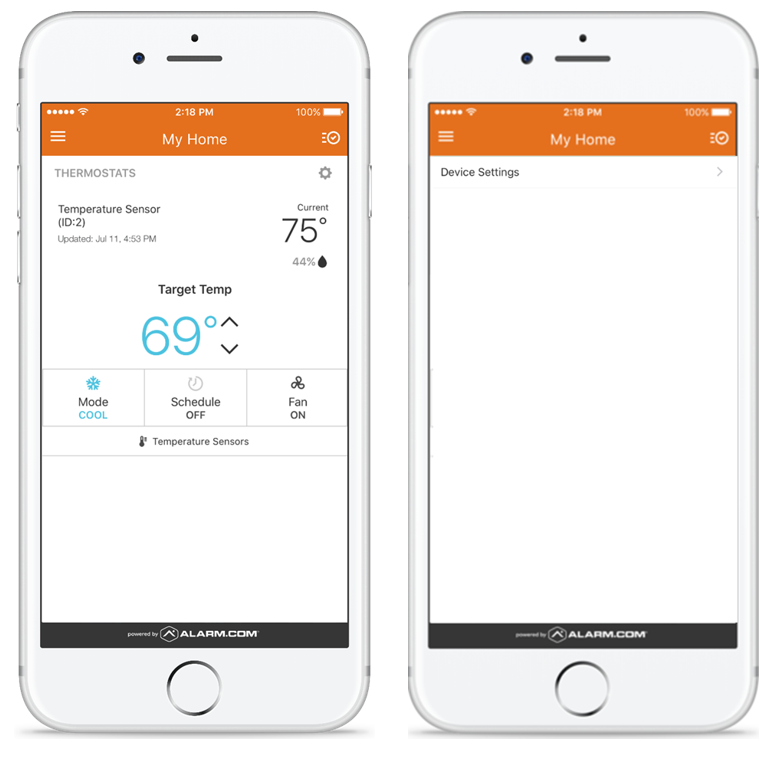
- Tap Thermostats on the thermostat card.
- Tap
.
- Tap Device Settings.
- Tap Humidity Control.
- Tap the Smart Humidity Control toggle switch to enable it.
- Tap
 .
. - Tap Apply to save changes.

Set humidity target levels
To regulate humidity levels in a home or business, the customer must select target humidity levels, similar to how a customer sets temperature targets for standard thermostat operation. The customer is prompted to set the humidity setpoints after enabling the Smart Humidity Feature.
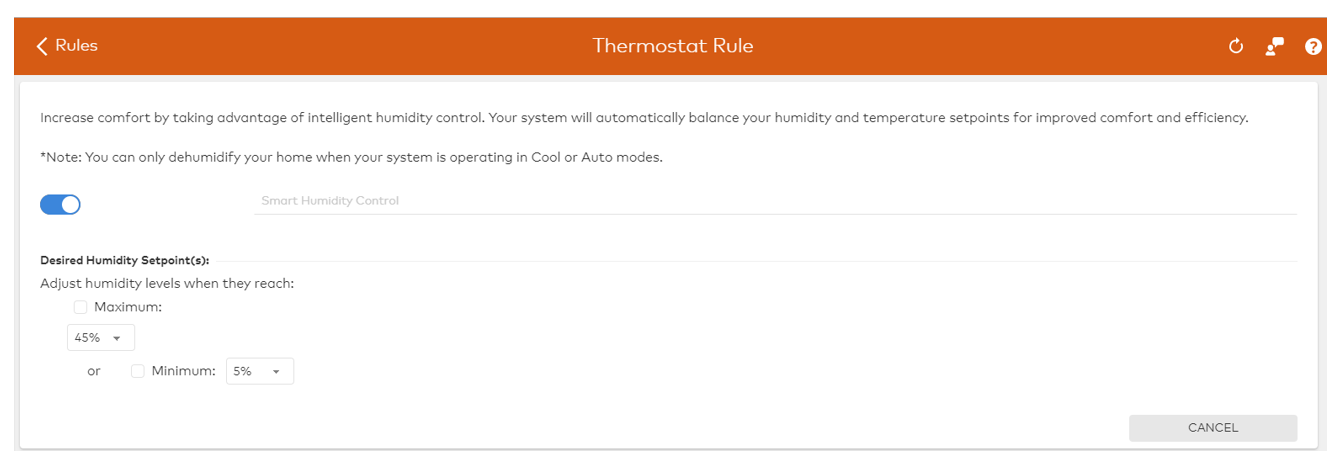
To configure Smart Humidity Control using the website:
- Log into the website.
- Click Automation.
- Click
on the existing Smart Humidity Control rule.
- Using the dropdown menus, select the desired humidity setpoints.
- Click Save.
Note: To disable Smart Humidity Control, click the toggle switch in the Smart Humidity Control rule.
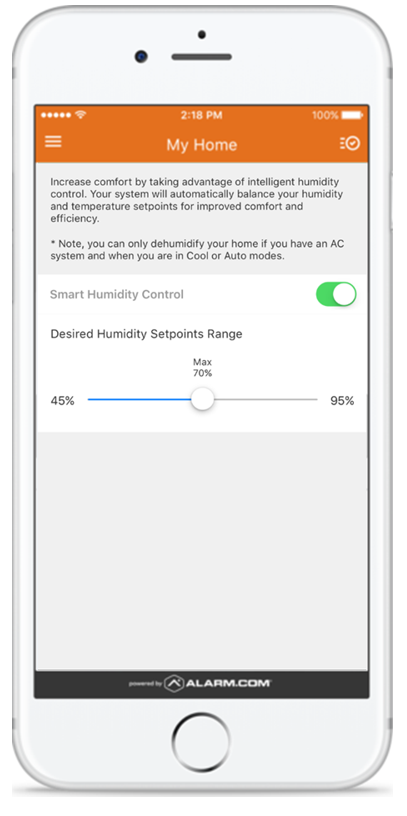
To configure Smart Humidity Control using the app:
- Log into the app.
- Tap Thermostats on the thermostat card.
- Tap
.
- Tap Device Settings.
- Tap Humidity Control.
- Use the slider to adjust to the desired humidity setpoints.
- Tap
 .
. - Tap Apply to save changes.
Note: To disable Smart Humidity Control, tap the Smart Humidity Control toggle switch.
Change the humidity differential
The humidity differential feature maintains a comfortable balance of both temperature and humidity levels in your home and is only necessary when the air conditioner is used to dehumidify the home. The humidity differential prevents a thermostat that is dehumidifying using an air conditioner from cooling too far below the cool setpoint. The default setting is 3⁰F (1.5⁰C) and generally does not need to be adjusted.
To adjust the humidity differential using the website:
- Log into the website.
- Click
on the thermostat card.
- Click Advanced Configuration.
- Click Advanced.
- In Humidity Differential, set the number of degrees the thermostat is allowed to go below the cooling setpoint when air conditioning is being used to dehumidify
- Click Save.
To adjust the humidity differential using the app:
- Log into the app.
- Tap Thermostats on the thermostat card.
- Tap
.
- Tap Device Settings.
- Tap Advanced Settings.
- In Humidity Differential, tap
to increase the degree, or tap
to decrease the degree. This is the number of degrees the thermostat is allowed to go below the cooling setpoint when air conditioning is being used to dehumidify.
- Tap
 .
. - Tap Apply to save changes.
Smart Humidity notifications
Smart Humidity notifications allow users to be notified if the thermostat reads a humidity level above or below the specified threshold.
To create Humidity Alert notifications using the website:
- Log into the website.
- Click Notifications.
- Click + New Notification.
- Click Temperature.
- Click Humidity Alert.
- Name the notification.
- In When device detects a relative humidity, click to select Above and/or Below, and then use their dropdown menus to select the threshold humidity percentage.
- In For the selected devices, click to select the thermostats the specified humidity threshold is applied to.
- Click + Add Recipient to specify which contacts receive the notification.
- Verify all desired settings are set, click Save.
To create Humidity Alert notifications using the app:
- Log into the app.
- Tap
.
- Tap Notifications.
- Tap
.
- Tap Use A Template.
- In Temperature, tap Humidity Alert.
- Name the notification.
- In When device detects a relative humidity, tap to select Above and/or Below, and then use their dropdown menus to select the threshold humidity percentage.
- In For the selected devices, tap to select the thermostats the specified humidity threshold is applied to.
- Tap + Add Recipient to specify which contacts receive the notification.
- Verify all desired settings are set, tap Save.